A Short Introduction to Making Documents using LaTeX
Ver 1.2 (last updated: Sep 24, 2008)
by Timothy Choi (t c h o i @ m a t h . u c i . e d u)
DISCLAIMER: This tutorial is only meant to be benefitted by math grads of UCI since the content contains numerous instructions specific to UCI math grads.
OBJECTIVES: The scribers from mathematical communities occasionally create documents with technical contents, such as formulas, matrices, or graphs. Although many commercial and freely available word processors are capable of making documents with technical contents, the documents created with LaTeX are by far the best in my personal view. This tutorial is prepared for the graduate students of the department of mathematics in order to introduce making simple documents using LaTeX.
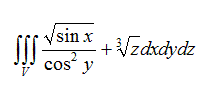
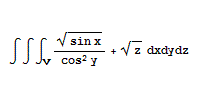
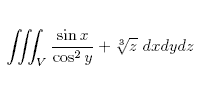
First of all, let us compare a mathematical expression manifested by three different ways: Microsoft Word, Mathematica, LaTeX.
 |
 |
 |
|---|---|---|
| Microsoft Word | Mathematica | LaTeX |
In MS Word to create the image above, one has to click few math symbols in the Equation Editor, and sometimes it can be frustrated since we don't have much control in terms of margins and spacings. Mathematica also limits us with spacing issues. If you compare the expression created by LaTeX with the first two, it looks more stylish and above all RIGHT! The following line is the actual entry in the LaTeX file to create the expression:
"\iiint_V \frac{\sin x}{\cos^2 y} + \sqrt[3]{z} \,\, dxdydz".
Yes, it looks cryptic. After making few documents, you wouldn't really find the expression cryptic any longer.
EXAMPLE 1: Here we make our first LaTeX document with the tex file named "HelloWorld.tex". We will refer a LaTeX document file as either a tex file or a latex file. Technically they are not the same thing, but I tend to ignore. Either we mean tex files or latex files, '.tex' will be used for the file extension.
|
\documentclass[letterpaper]{article} \begin{document} \noindent Hello, World! \end{document} |
|---|
The content inside the box is all we need in the tex file named "HelloWorld.tex". A tex file is saved as a 'text' file, so you may use any text editor of your choice to create a tex file. Later we will explain in details, but for now just accept that the tex files can be processed through the LaTeX program to create popular document formats such as DVI, PS, or PDF. We created the PDF file that is produced from the tex file "HelloWorld.tex". Click here to see the PDF file ("HelloWorld.pdf"). Now let us give a quick overview of the document "HelloWorld.tex". Whatever appears between \begin{document} and \end{document} is the actual content of the document. In the example, the text "Hello, World!" is the only thing that appears in the PDF documnet although we also have \noindent, which doesn't appear in the content. It is a LaTeX command which ignores the default indentation for a paragraph. Whatever comes between \documentclass[letterpaper]{article} and \begin{document} are special instructions for the LaTeX document such as margins, fonts, packages, and etc. For this example, there is no special instruction has been specified.
DOCUMENT CREATION: Before we go on with more technical aspectes of preparation of LaTeX documents, let us describe ways of making DVI, PS, or PDF documents from tex files. If you are a UCI math grad, then you will have an account (i.e. login name and password) for the math server with the host math.uci.edu. Note that your login name could be possibly different from your UCInetID. We will refer math.uci.edu account as the math account. Make sure that you have both math account login name and password before your move on. Now if you have them ready, then here is the overview:
- Using a SSH client, log in to the math server math.uci.edu.
- Create a tex file using one of available text editors (such as Pico, Emacs, Vi(m), and etc.).
- Run a LaTeX program to process the tex file to produce a DVI, PS, or PDF document file.
STEP 1: You wouldn't be able to connect to the math account using a unsecured telnet. You can only connect to the math account using the SSH (Secure SHell) telnet client. If you are using Windows, you can try freely available SSH clients such as PuTTY (google "putty ssh"). If you are using Mac, you can try MacSSH (google "MacSSH"). However, if you have fairly new Mac, then no need to use 3rd party SSH client as the Mac OS is already equipped with OpenSSH in its kernel as in Linux. If you are using Linux, you may use the OpenSSH (just type "ssh"). Using the OpenSSH in the terminal, here is a typical way to login:
ssh -l[math account login name] math.uci.edu
There is no space between -l and the login name. UCI NACS also has suggestions for SSH clients. Click here for their suggestions. Aftering installing the SSH client, log in to the math account. Now you will realize that you are positioned at the shell called tcsh, the enhanced version of csh, the Berkeley UNIX C shell. If you have read this far, you can't escape now. You are entitled to learn some basics of UNIX commands. Although the math server uses Solaris as its operating system, we will just refer as UNIX. If you are already a UNIX guru, then that's fine and you may skip as many paragraphs as necessary. But if you aren't, then this will be a good opportunity to start. We will be instructing you about UNIX commands just so that you can do the following basic tasks: make/remove directory, copy/remove/move file, list files and directories, and cruise over directories. As soon as you log in to the math account, there is first thing to do, i.e. making the prompt (that is the last text 'math%' that appears in the SSH client when you log in) more meaningful. Just follow the procedures:
- Type pico .cshrc and press the Enter key. A text editor called pico will open the file named ".cshrc". In UNIX the file name that starts with the period (or the dot) indicates that the file is a hidden file.
- Using the arrow keys, move the cursor to the bottom of the text. Press the Enter key (if necessary) to start a new line.
- Type set prompt="%n@%~] " and press the Enter key. Note that there is an extra space between the right square bracket and the second double quotation mark.
- Press the Control key together with the alphabet letter 'o' (i.e. 'o' as in orchid), and press the Enter key. In pico this simultaneous combination of two keys saves the file.
- Press the Control key together with the alphabet letter 'x'. In pico this combination of two keys exits pico.
- Type exit and press the Enter key to log out from the shell.
- Log back in to the math account again.
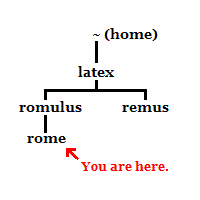
STEP 2: Here we will create a tex file using the text editor pico we used in the STEP 1. Before that, we first make a directory named 'latex' in your home directory so that we can create all these tex files in that directory. The portion '@~' of the prompt means that you are currently at the home directory. The tilde '~' is used to represent your home directory, so from now on '~' is referred as the home directory. Now let us create a directory called 'latex' using the UNIX command 'mkdir' from "make directory". Just follow the procedure:
- Type mkdir latex and press the Enter key. A directory called 'latex' has just been created under the home directory '~'.
- Type cd latex and press the Enter key.
- Type cd ~/latex and press the Enter key.
- Type cd ./latex and press the Enter key.
 |
|---|
- Type cd ../../remus and press the Enter key.
- Type cd ~/latex/remus and press the Enter key.
- Type cd ./../../remus and press the Enter key.
- Type rmdir remus and press the Enter key.
- Type rmdir ~/latex/remus and press the Enter key.
- Type rmdir ./remus and press the Enter key.
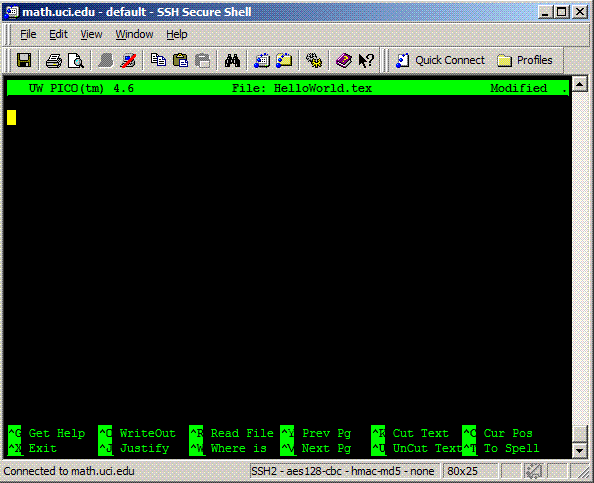 |
|---|
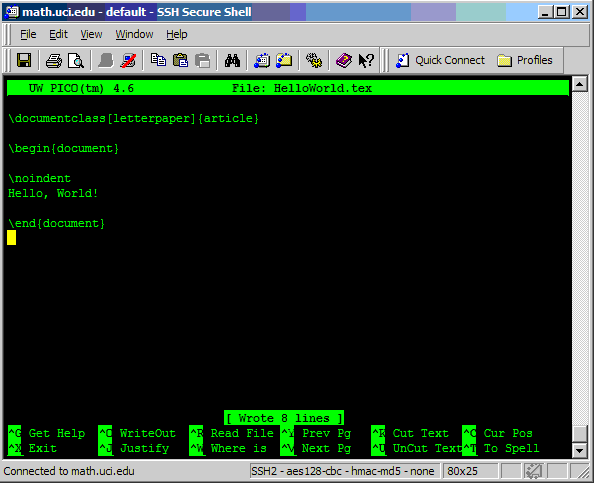 |
|---|
STEP 3: We will make DVI, PS, and PDF document files from the tex file "HelloWorld.tex" that we created in STEP 2. Make sure that you are still in the directory where "HelloWorld.tex" was created, i.e. the directory called 'rome'. To create a DVI document, type latex HelloWorld.tex and press the Enter key. The program 'latex' will run in verbose mode, so you should be able to see what the program does. If you have created the tex file correctly, you should see the following line in the message that 'latex' printed: "Output written on HelloWorld.dvi (1 page, 232 bytes)". Congratulations! You have created your very first DVI document using LaTeX. As much as you want to see the document in a DVI viewer, we will deter that for now. However, we will verify that the DVI file has been created by listing the files in the directory 'rome' using the command 'ls' from "listing files and directories". To list the files in the current directory, type ls and press the Enter key. You will see four files in the directory, and one of them is the DVI file that we wanted to see. The other two files, "HelloWorld.log" and "HelloWorld.aux", are by-products of processing the tex file. Most likely we do not have to pay attention to these by-products. Now let us create a PS document file. We will not create a PS file from the tex file directly, but we will convert the DVI file "HelloWorld.dvi" to a PS file. To convert the DVI file in order to create a PS file, type dvips HelloWorld.dvi and press the Enter key. Now verify that the PS file has been created by listing the files in the directory. There is also a way of converting a PS file to a PDF file by typing ps2pdf HelloWorld.ps, but we will describe a way to create a PDF file from the tex file directly. To create a PDF document file from the tex file (which is what you most likely to do so), pdflatex HelloWorld.tex and press the Enter key. Either way you chose, you can verify that the PDF file "HelloWorld.pdf" has been created by listing the files in the directory. You could also create a PDF file using the DVI file by typing dvipdf HelloWorld.dvi and create a PS file using the PDF file by typing pdfps HelloWorld.pdf.
Let us make some remarks about the command 'ls'. One can also list not only the name of the files but also more information about the files such as the date when the file was modified, size, ownership, and etc. If we type ls -l, then we will first list the files in one column and get more information about the files. We added '-l' after the command 'ls' to show file information, and is called an option of the command. There is one more useful option to know for 'ls'. If we type ls -a, then we can even see the hidden files which have the period as their first character in the file names. The directory 'rome' would not have any hidden files, so it is not a good place to check this option. Change the directory to '~', the home directory, and try to list the files using 'ls' first. Now try 'ls -a', and at least you will see the very first file we edited ".cshrc" when you use 'ls -a' but not when you use 'ls' since it is a hidden file. You can also combine two options to type ls -la.
DOCUMENT VIEWING: We finally created DVI, PS, and PDF document files from the tex file "HelloWorld.tex". Now we wish to see these documents. We will only describe how this can be done for the PDF file. The mechanism is the same for the other types. We have two options for this. We can use a FTP (file transfer protocol) client to download "HelloWorld.pdf" to your MS Windows or Mac desktop and open the PDF file with Adobe Acrobat and print. For a tutorial on using FTP clients, we will point you to the following link provided by EEE (eee.uci.edu). An alternative (but not safe due to its insecurity) way is to copy the PDF file to your web space and download the file from any web browser and open it with Adobe Acrobat and print. Wait a minute. Do we have web space? Yes, anyone with the math account has web space given. Everything that is contained in the directory named 'public_html' under the home directory will be available on the web. Create a directory called 'public_html' and create another directory 'latex' under 'public_html' so that its absolute path would be '~/public_html/latex'. If we copy (or move) the PDF file to this directory, then the file is available on 'http://math.uci.edu/~{math account login name}/latex'. Note that the part 'public_html' is not spelled out in the URL and the curly brackets around the login name should not be typed.
Now we owe you to explain how to copy (or move) files. The commands are 'cp' from "copy files" and 'mv' from "move files". Assuming that two directories 'public_html' and 'latex' have already been created, from the directory 'rome', we type
cp HelloWorld.pdf ~/public_html/latex or type cp HelloWorld.pdf ./../../../public_html/latex
to copy the PDF file "HelloWorld.pdf" to the directory 'latex' under 'public_html' (not under the home directoty). Check if the file was copied by using your favorite web browser with the URL 'http://math.uci.edu/~{math account login name}/latex'. Once you see the file, you can download and print. What would be the problem with this method of viewing? Yes, the file can be viewed by millions out there as long as the URL is known. If the file was for either quizzes or exams, then we need to be more careful about them. We will leave to you how you would deal with this security issue.
WHAT'S NEXT?: We have created a tex file in the Linux shell of the math account and made various documents from the tex file. We also discussed how to view these documents. Along the way, we also learned few Linux commands just enough to get by. Next, we will discuss creating documents with mathematical contents. Click here to go on with the tutorial.
© 2006 - 2008 Timothy Choi